How to Make an Answer Key from a Photo
See how to make an answer key from a photo in myTpen Answers: the extracted question, highlighted final answer, and numbered steps to teach before class.
myTpen Team9 min read
- Answers
- Teaching
- Answer keys
- Workflows
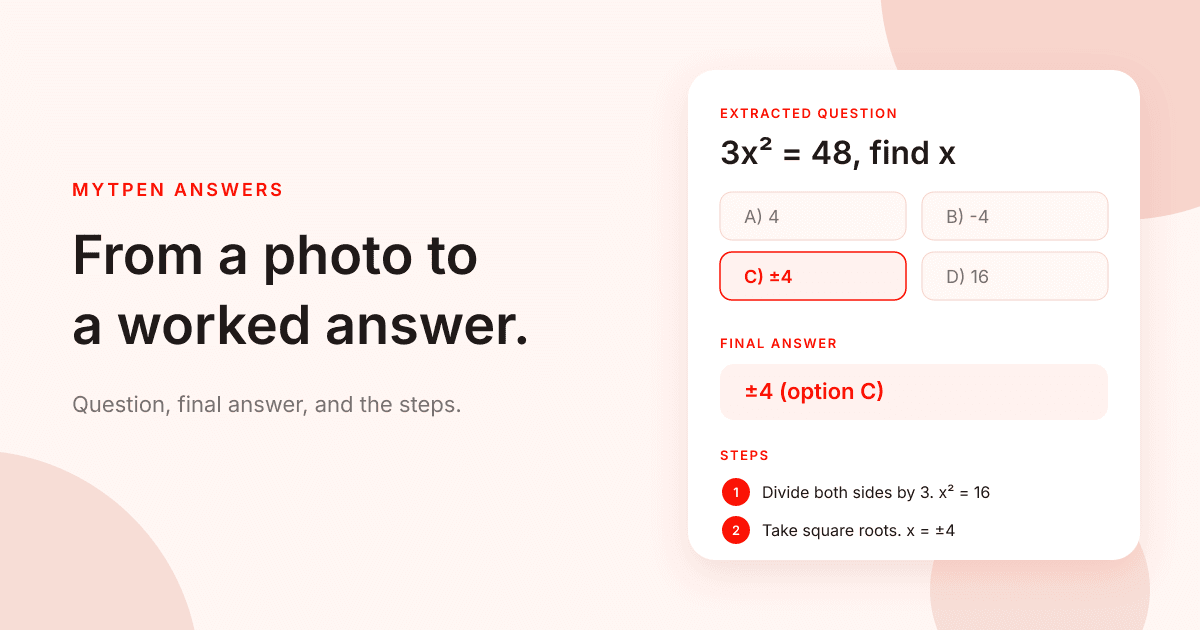
You have the question already, on a worksheet, a slide, or a photo a student sent after school. The missing piece is the worked answer, in an order you can say out loud. This guide is how to make an answer key from a photo when the period is close and the steps are not written down yet. Answers is the myTpen workflow for that job. You bring the image. The screen returns the question it read, a highlighted final answer, numbered steps, and a short explanation.
This is for the teacher doing that work herself, including the many women who check one more problem after the school day is already over.
What an answer key from a photo is for#
An answer key needs the final answer, so homework can be checked, the steps, so the board matches the method you taught, and a few words of explanation, so a wrong choice can start a conversation.
myTpen is where we build academic workflows for teachers. We built workflows, not apps. The name on the front of the site is The EdTech Operating System. Answers is one of the Educator Bundle tools, for when the question already exists and you need structured answers you can teach from.
Pricing is not listed on the site. Create a free account at mytpen.app and open Answers with the question in front of you. When you need a narrated explanation of a topic, use Lessons. Other guides live in the Knowledge Hub.
What you see on the Answers page#
The page heading is "Answers to all your questions". You drag and drop an image, or you click to select one. The copy says: "Drop a screenshot of your question-based material. Our AI will read, interpret, and generate structured answers."
Upload a screenshot of the question, or use your phone's camera to snap a picture. Click "Upload and Analyze". The screen shows "Processing...". Within seconds the answer appears.
The tutorial shows the image, the button, and the answer. It does not show a settings menu, an export button, or a share button. You read the working on the screen, then carry it into the key or the homework check.
How to make an answer key from a photo#
Watch the tutorial once, then use your own question.
- Create a free account at mytpen.app if you do not have one yet.
- Open Answers. The heading is "Answers to all your questions".
- Drag and drop a screenshot of the question, or click to select it. A phone photo of the question works the same way.
- Click "Upload and Analyze", and wait through "Processing...".
- Read the result in order: Extracted Question, Final Answer, Steps, Details.
- Write the final answer and the steps into the key you keep, or onto the board the next time you teach that problem.
What the screen gives you back#
Four parts come back, and each one has a job.
| Part | How a teacher uses it |
|---|---|
| Extracted Question | What was read from the image, so you can check it first |
| Final Answer | The highlighted result, with the option on a multiple-choice item |
| Steps | Numbered working you can follow or write on the board |
| Details | A short explanation of the result |
The tutorial question, worked#
The tutorial item is 3x^2 = 48, find x. The choices are A) 4, B) -4, C) ±4, and D) 16.
The final answer is "±4 (option C)", and it is highlighted. The steps are the board work. Divide both sides by 3 to get x^2 = 16. Take square roots to get x = ±4.
Option C is the line you mark. The steps answer why 4 alone is incomplete. The narration says myTpen also provides step-by-step explanations, making it easier to teach and understand, and that teachers and students can quickly resolve difficult homework problems and understand concepts faster.
Worked solutions from a question image#
A worked solution from a question image keeps that shape: the question as read, the final answer set apart, the steps in order, and a short detail. If the extracted question matches, you have the bones of the key. If it does not, snap it again, flatter and closer, and click "Upload and Analyze" once more.
Step-by-step answers from a screenshot#
A screenshot is often what you have: a texted textbook item, one worksheet line, or last year's slide. Drop it in. Step-by-step answers from a screenshot are the numbered Steps under the highlighted Final Answer. On the tutorial item, divide by 3, then keep both square roots.
A photo math solver for teachers#
A photo math solver for teachers, here, is how you prepare an answer key, explain the steps in class, and check homework against the method you taught. Before class, read the steps for the question that will stall the room. While you mark, compare the student's line with those steps. The place the method stops is the place you talk about.
How to create an answer key for a worksheet#
A worksheet is a list of questions, and the key is the matching list, with enough working that another adult could mark as you would. Here is how to create an answer key for a worksheet from a photo.
The tutorial is one question in, and one structured answer out. For a longer sheet, photograph each item you need, upload it, and keep the final answer, the steps, and one sentence from the details next to that number.
An answer key from a worksheet photo stays close to the screen. For the tutorial item, the teacher copy holds ±4 (option C), the two steps, and a note that both signs belong. Teachers look for an AI answer key for teachers because the sheet is printed and the evening is short. Read the steps before they carry your name. What the class was taught stays your call.
Check homework with the steps in front of you#
Upload the question, read the steps, then look at the paper. On 3x^2 = 48, a line that stops at 4 kept only the positive root. The final answer on screen is ±4, option C, so the second step is the conversation: where did the other value go?
When both moves are already on the page, you mark the line and move on. Save the photo for the item that takes the hour.
Where Answers sits next to Lessons#
Answers returns the extracted question, the final answer, the steps, and the details from a screenshot or a camera photo. Lessons plays a narrated video from a topic, and you can export that lesson as a PDF. The guide is How to Turn Any Topic into a Narrated Video Lesson in Minutes.
Use Answers when the question is already in your hand, and Lessons when the idea comes first. They are two workflows in The EdTech Operating System. More writing for teachers is in the Knowledge Hub. Account questions are on the FAQ, and support is there if something blocks you.
Where it fits in your workflow#
Answers is the start of Instant Doubt Solving. The question arrives as a photo. You get the explanation, teach the working, and send the notes home.
- Answers takes the photo from the phone camera and returns the step-by-step explanation.
- Open Board, explain the question, and solve it there.
- Export the notes and share them with students.
The photo starts the workflow. Board is where the class watches the solution come together. The export is what they keep. That is Instant Doubt Solving in The EdTech Operating System.
Frequently asked questions#
Can a teacher make an answer key from a photo of a question?#
Yes. Drop a screenshot or snap the question, then click "Upload and Analyze". After "Processing...", the extracted question, highlighted final answer, numbered steps, and explanation are what you write into the key.
What should a worked answer key include besides the final answer?#
The steps, and a short explanation. Final Answer is highlighted, Steps are the numbered working, and Details explains. For the tutorial question the answer is "±4 (option C)", after dividing by 3 and taking square roots. A key that only lists C leaves the sign untaught.
How do you get step-by-step answers from a screenshot?#
Drag and drop the screenshot, or click to select it, then click "Upload and Analyze". Within seconds the numbered steps sit under the final answer.
How can a teacher use a photo math solver with a class?#
Prepare the key, put the steps on the board, and check homework against the method you taught. The tutorial says the explanations make it easier to teach and understand, so teachers and students can resolve difficult homework problems and understand concepts faster.
How do you check the answer before you use it in class?#
Read the extracted question first, and upload a clearer image if it is wrong. On 3x^2 = 48, dividing by 3 gives x^2 = 16, and the square root is both 4 and -4, option C. If a step is not your method, keep what still holds and say the rest in your own words.
Which app do you use after Answers?#
Open Board, explain the question, and solve it there. Then export the notes and share them with students.
What we mean by a mighty teacher#
The mission is to make teachers mighty again. Mighty, here, is practical. A question on a worksheet can become a worked answer without an evening of retyping, and without a teacher's edition you do not have.
We built workflows, not apps. You upload the image, read the four parts, and teach. myTpen is backed by Google and partnered with Coursera. The question stays yours, and so does the method you honor in the room.
Become mighty again.
Try it on the question you are about to explain#
Pick the item the class will stall on. Photograph it, or use the screenshot you already have. Click "Upload and Analyze". Read the extracted question, then the steps, and use them the next time that class meets.
Create a free account at mytpen.app.
Create a free account
Open myTpen and start with the workflow you need before the next class. Pricing is not listed publicly.
Create a free account